

Improve Website Performance: Factors That Affect Website Speed

The speed at which a website loads is not only crucial for retaining visitors but also for search engine optimization. Slow-loading websites can lead to higher bounce rates, resulting in a negative impact on user experience. Let’s explore the key factors that affect website performance and how to address them effectively.
Jump to our Improvement Section
- Prioritize Visible Content – Eliminate Render Blocking Assets
- Image Optimization – Compression
- LazyLoad Images
- Minify CSS and JavaScript
- Compression: Deflate, GZIP & Brotli
- Leverage Browser Caching
Website Speed: The Key Measure for Website Performance
Website speed is measured by the time it takes for a web page to load fully. It is influenced by various factors, including website design, server configuration, and file size. A slow website speed can hinder user engagement, as visitors become impatient and may navigate away before the page fully loads.
Important Factors That Affect Website Speed
Browser Compatability:
Different browsers have varying capabilities when it comes to handling web content. Factors such as cache management, rendering, and handling JavaScript can impact the speed at which a website loads. Optimizing your website to perform well across different browsers can ensure a consistent and fast user experience.
Page Load Time:
The time it takes for a web page to load is an essential factor impacting website speed. Excessive multimedia content, poorly optimized code, and an overloaded server can significantly slow down your page load time. Streamlining your website’s code, compressing images, and utilizing content delivery networks (CDNs) can help reduce page load time.
Server Performance:
The performance of the web server hosting your site plays a crucial role in website speed. Factors such as the server’s hardware specifications, network connectivity, and server load can impact how quickly your website serves content to users. Regularly monitor and optimize your server to ensure optimal performance.
File Size:
The size of files, including images, videos, and scripts, can significantly impact website speed. Optimizing file sizes by compressing images, minifying CSS and JavaScript, and utilizing efficient file formats can help reduce file sizes and improve website performance.
Taking Steps to Optimize Website Speed
To improve your website’s speed and overall performance, consider implementing the following strategies:
Check Your Website Page Speed Regularly:
Regularly test your website’s speed using various tools available online to identify areas of improvement. Analyze the test results and address any bottlenecks hindering your website’s performance.
Optimize Website Design and Development:
Ensure your website’s design and development follow best practices for performance. Use efficient coding techniques, scalable hosting solutions, and responsive design to create a fast and mobile-friendly website.
Utilize a Content Delivery Network (CDN):
A CDN distributes your website’s content across multiple servers, reducing the distance and time it takes for the content to reach users. This can greatly improve website speed, especially for visitors located far from your server’s location.
Minimize External Scripts and Plugins:
While third-party scripts and plugins can enhance your website’s functionality, they can also slow it down. Evaluate and remove any unnecessary scripts or plugins that may be negatively impacting your website’s speed.
How to eliminate render-blocking JavaScript and CSS in above-the-fold content?
(you can find a more in-depth article on prioritizing visible content here but to fix the issue continue reading)
The answer to this sounds simple. Move the requests for such files below the HTML that loads your above-the-fold content, right? Well yes that is correct and in fact, we place it right at the bottom of the code before the closing body tag but that does cause an issue.
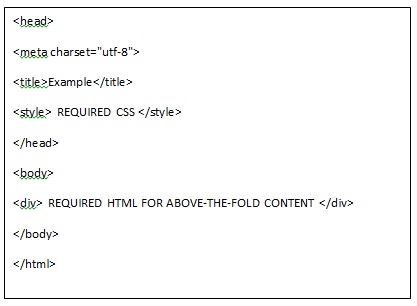
The above fold content requires information from the CSS file in order to display properly. So what we do is place all the CSS required to display the above-the-fold content within the HTML file itself. We place it within style tags above the HTML and within the header tags as shown below.
This now sounds more complicate however there are some tools that help us do this.
TOOL 1
The simplest tool I have found is “Sitelocity’s Critical Path Generator”
Simply enter your site address including the http:// or https:// and click the ‘GENERATE CRITICAL PATH CSS’ button. The tool will then automatically download your sites CSS file and copy the required section for the above-the-fold content. It then minifies the CSS and outputs it ready for you to input into your HTML file as described above.
TOOL 2
Another tool is the “Critical Path CSS Generator”
- enter your website address
- Paste your entire CSS file into the box indicated
- Hit the “create Critical Path CSS” button
Then it will generate the CSS required to display the above fold content. You then simply add the generated CSS into your html file as described above.
How to Load Fonts Asynchronously
This simply means fetching them from a server simultaneously without blocking the rendering of the rest of the website. By employing this approach, you can provide your users with a more enjoyable browsing experience while maintaining the aesthetics of your website’s typography.
- Using the Web Font Loader Library:
The Web Font Loader, developed by Google, is a valuable JavaScript library that allows you to control how and when web fonts are loaded. This library provides a simple and powerful mechanism to load fonts asynchronously. You can easily integrate it into your website by following these steps:
i. Include the Web Font Loader script in your HTML:
<script src="https://ajax.googleapis.com/ajax/libs/webfont/1.6.26/webfont.js"></script>
ii. Specify the fonts you want to load asynchronously by creating a configuration object:
WebFont.load({
  google: {
    families: ['Open Sans', 'Roboto']
  }
});
- Leveraging the Font Face Observer Library:
Another excellent tool to load fonts asynchronously is the Font Face Observer library. This lightweight JavaScript library helps ensure that your website only starts rendering once the fonts have been loaded. Follow these steps to incorporate the Font Face Observer library into your website:
i. Include the Font Face Observer script in your HTML:
<script src="https://cdnjs.cloudflare.com/ajax/libs/fontfaceobserver/2.0.13/fontfaceobserver.js"></script>
ii. Create an instance of the Font Face Observer and define the fonts you want to load asynchronously:
const font = new FontFaceObserver('Open Sans');
font.load().then(() => {
  console.log('Open Sans has loaded!');
});
- Combining Both Approaches:
To have even more control over font loading, you can combine the Web Font Loader and Font Face Observer libraries. This hybrid approach allows you to define fallback fonts and adds a layer of reliability to ensure a smooth loading experience.
Image Optimisation – Convert JPEG and PNG images into WebP (Best Image Format)
(See full article here for image optimization)
First you will need to convert png and jpeg etc into webp format ( I like using this site for most media conversions as it’s a great free web tool and has no watermark) then upload both versions.
Webp, developed by Google, is a modern and highly efficient image format that brings a whole new level of optimization and performance to the table. It is a great way to optimize your image files without visible loss in image quality.
Webp combines advanced compression techniques to deliver small file sizes without compromising image quality. This means faster website loading times and reduced bandwidth usage, which is a win-win for both users and website owners.
Unfortunately, not all browsers can handle webp images for example but we can solve the problem with the following code.
Background Image
We can use something like this to fix the issue for background images.
create an associated class for the div (I will use .optImg) and in one of your stylesheets add
<style>
.optImg {

         background-image: url(https://example.co.uk/images/example.jpg) no-repeat center center!important;

         background-image: image-set(url("https:/example.co.uk/images/example.webp") );
}
</style>
This tells the browser to load the image-set URL if it can be rendered but the normal URL if not.
Normal Image
The best solution to display a normal image where you need to render the webp image if possible you can use this HTML code.
<picture>

<source type="image/webp" srcset="https:/example.co.uk/images/example.webp">

<source type="image/png" srcset="https:/example.co.uk/images/example.png">

<img src="https:/example.co.uk/images/example.png" alt="example" loading="lazy">
</picture>
This will display your image above the fold in the appropriate format. Remember to fill in the alt text to describe your image for improved image seo.
How To ‘Lazy Load’ Images
(See full article here for image Lazyload )
Lazy Load means requesting the images when they are required to render as in when the user scrolls down towards them. To do this we can use some JavaScript placed towards the bottom of the HTML file.
<script>
const images = document.querySelectorAll("[data-src]"); //find all images that have the data-src attribute
function preloadImage(img) {
const src = img.getAttribute("data-src")
if(!src){
return;
}
img.src = src;
}
const imgOptions = {
threshold: 0,
rootMargin: "0px 0px 400px 0px" //change the distance between where the scroll is and when the images load (increase for slower-to-load images)
};
const imgObserver = new IntersectionObserver((entries, imgObserver) => {
entries.forEach(entry => {
if (!entry.isIntersecting) {
return;
} else{
preloadImage(entry.target);
imgObserver.unobserve(entry.target);
}
});
}, imgOptions);
images.forEach(image => {
imgObserver.observe(image);
});
</script>
Then within the img tags we replace src=”” with data-src=””. Normally this prevents the images from loading at all but when the JavaScript runs, after the page load, then it changes the data-src tags back to src tags and the images will load.
Online Tools to Minify JS and CSS Code
Below are some online tools. to help you. Each allows you to minify your html css and Javascript files. You will need to copy and paste your original code and then click minify. Then just copy the minified versions and use them to replace your un-minified files.
(View full article on minifying JS and CSS)
CSS Minification Tool
https://www.freeformatter.com/css-minifier.html
Javascript Minification Tool
https://www.freeformatter.com/javascript-minifier.html
How to Enable GZIP Compression on your Static Apache Site
(View Full Compression article here)
There are several ways of enabling compression the most common being using your .htaccess file on apache servers or your web.config file if you are on a windows server. This method works whether you are using shared hosting (allocated space on a server) or if you have a dedicated server. Because of this I will show you these methods for enabling gzip and deflate compression.
Enable Compression using .htaccess file
(if you don’t have a .htaccess file and are not sure how to create one then check out this tutorial)
Insert the following into your .htaccess file
# BEGIN GZIP
# mod_gzip compression (legacy, Apache 1.3)
<IfModule mod_gzip.c>
mod_gzip_on Yes
mod_gzip_dechunk Yes
mod_gzip_item_include file \.(html?|xml|txt|css|js)$
mod_gzip_item_include handler ^cgi-script$
mod_gzip_item_include mime ^text/.*
mod_gzip_item_include mime ^application/x-javascript.*
mod_gzip_item_exclude mime ^image/.*
mod_gzip_item_exclude rspheader ^Content-Encoding:.*gzip.*
</IfModule>
# END GZIP
Enable Deflate Compression on ionos
Copy and paste this into your .htaccess file
<IfModule mod_deflate.c>

AddOutputFilterByType DEFLATE text/plain

AddOutputFilterByType DEFLATE text/html

AddOutputFilterByType DEFLATE text/xml

AddOutputFilterByType DEFLATE text/css

AddOutputFilterByType DEFLATE application/xml

AddOutputFilterByType DEFLATE application/xhtml+xml

AddOutputFilterByType DEFLATE application/rss+xml

AddOutputFilterByType DEFLATE application/javascript

AddOutputFilterByType DEFLATE application/x-javascript

AddOutputFilterByType DEFLATE image/svg+xml

</IfModule>
New
Use Gzip On Ubuntu NGINX Site
Use the following code to activate effective compression on NGINX Sites GZIP is supported and works on Ubuntu servers.
gzip                on;
gzip_min_length     1000;
gzip_buffers        4 8k;
gzip_http_version   1.0;
gzip_disable        "msie6";
gzip_types          text/plain text/css application/json application/javascript application/x-javascript text/xml application/xml application/xml+rss text/javascript;
gzip_vary           on;
Enable Gzip Compression in WordPress to Boost Website Speed
Are you looking to improve your website’s speed? One of the most effective ways to achieve faster load times is by utilizing gzip compression. In this article, we will delve into the world of compression and show you how to enable gzip compression in WordPress to enhance your website’s performance. Let’s get started!
Enabling Gzip Compression in WordPress
Method 1: Plugin Installation
- One of the simplest ways to enable gzip compression in WordPress is by using a compression plugin. Popular options include “WP Super Cache” and “W3 Total Cache.”
- Install and activate the chosen plugin, navigate to the settings, and enable gzip compression.
- Method 2: Modifying the .htaccess File
- For advanced users comfortable with editing server files, you can manually enable gzip compression by modifying the .htaccess file (see above)
- Add the following code to your .htaccess file:
- Save the changes and test your website’s performance.
Configure Brotli Compression
If your server has Brotli enabled then you can enter the following into your .htaccess file to configure Brotli on your site.
<IfModule mod_brotli.c>
    AddOutputFilterByType BROTLI_COMPRESS text/html text/plain text/xml text/css text/javascript application/javascript application/x-javascript application/json application/xml
    BrotliCompressionQuality 4
</IfModule>
leverage browser caching and Improve load time?
(See full article here for Browser Caching)
We have to separate the files by their type i.e. Images, JavaScript, HTML, CSS files etc. and then set the period that they are cached appropriately.
The easiest and most common way is to add some code to our .htaccess file.
If you haven’t already created a .htaccess then you can use our tutorial to create the file. Firstly copy and paste the code into notepad and follow the instructions we have outlined here How to create a .htaccess file.
Add the following Code for an efficient Caching Policy
Open up your .htaccess file and paste the following snippet into it.
## LEVERAGE BROWSER CACHING ##
<IfModule mod_expires.c>
ExpiresActive On
ExpiresByType image/jpg “access plus 1 year”
ExpiresByType image/jpeg “access plus 1 year”
ExpiresByType image/gif “access plus 1 year”
ExpiresByType image/png “access plus 1 year”
ExpiresByType text/css “access plus 1 month”
ExpiresByType application/pdf “access plus 1 month”
ExpiresByType text/x-javascript “access plus 1 month”
ExpiresByType application/x-shockwave-flash “access plus 1 month”
ExpiresByType image/x-icon “access plus 1 year”
ExpiresDefault “access plus 2 days”
</IfModule>
## LEVERAGE BROWSER CACHING ##
And once uploaded that is it. Congratulations, your have successfully leveraged Brtowser Caching on your site. That’s another tick and an increase in points for your google pagespeed insights results.

I am a self-motivated, passionate website designer and developer. I have over ten years of experience in building websites and have developed a broad skill set including web design, frontend and backend development, and SEO.
Using my growing knowledge base I have built my own company (scriptedart.co.uk) creating websites, e-commerce stores and producing custom graphics and web app functionality for a range of local businesses.